MailCub Logo Image

Gettting started

Guide on how to setup MailCub Account

What is MailCub?

MailCub is a comprehensive email service provider offering reliable, scalable, and secure solutions for businesses of all sizes. Whether you need to send transactional emails, host professional inboxes, or deploy dedicated servers — MailCub has you covered.

Built for developers and teams, MailCub provides RESTful APIs, an intuitive dashboard, and enterprise-grade infrastructure to ensure your messages reach their destination every time.

Quick Start

1. Create Your Account

Sign up for a MailCub account to get started.
👉 Create an account

2. Choose Your Service

Select from Email Delivery, Hosting, or Custom Servers.
👉 View pricing

3. Configure Settings

Set up your API key, domain, Qoutas from the client panel.
👉 Go to dashboard

API Key

API Key guide usage and restriction guide by MailCub

What is an API Key?

An API key is a unique identifier used to authenticate your application when integrating with MailCub. You'll need an API key to send emails via the MailCub API, it enables your business application to securely call MailCub's email delivery endpoint.

Every call must contain the version number. The latest version is v1.

Endpoint
https://api.mail.mailcub.com/api/send_email

Use this endpoint with your API key and proper request body to trigger email delivery.
or use the mailCub package npm i mailcub

Response Codes & Meaning

HTTP Status Meaning Description
200 Success The email was accepted and queued for delivery.
401 Request Unauthorized The API key is missing or invalid.
403 Domain not verified The "from" domain in the request is not verified in your account.
404 Domain not found The domain used in the "from" address is not associated with your account.
422 Account paused Your account is currently paused — please contact support.
429 Rate limit / quota exceeded You have exceeded your monthly/usage quota or API rate limit — upgrade required.
102 Account suspended Your account is suspended due to policy or spam issues — contact support.

Best Practices

  • Store your API key securely and never expose it in frontend code.
  • Ensure the "from" domain in your requests is verified in your MailCub account.
  • Monitor your API rate (15 requests/second) and overall monthly sending usage to avoid hitting limits.
  • Regularly rotate your API keys if possible for added security.

Setting up Email Delivery

Guide on how to setup email delivery with MailCub

Set Up Your Account

You'll need an active MailCub account to generate an API key. Create one from our signup page and get your free trial.

Once your account is confirmed, navigate to your Dashboard → API Keys.

Creating an API Key

  1. While logged in, click API Keys in the sidebar.
    sidebar
  2. Under the API Keys tab, click Create New API Key.
    API keys list
  3. Name your API key.
    create API popup
  4. Click Create API Key.
  5. Copy and store your key securely — you'll use it for every API request to send emails from your application.

Add Your Domain

To configure your custom domain:

  1. Go to Domains in the sidebar.
    domain sidebar
  2. Click Add Domain.
    domain popup
  3. Verify ownership by setting up DNS records (MX, SPF, DKIM).
  4. Wait for DNS propagation (up to 48 hours).
    domain verification popup

Send Your First Email

Use our official MailCub Node.js SDK or the REST API directly.

Node.js
Python
PHP
cURL
        
        const mailcub = require('mailcub');
        const secretKey = 'your-secret-key';

        const emailBody = {
            email_from: 'user@yourdomain.com',
            receiver: 'user@example.com',
            subject: 'Subject',
            html: 'Hello',
            attachment: 'attachment_path'
        };


        mailcub.sendMail(emailBody, secretKey)
        .then(() => {
            console.log('Email sent successfully');
        })
        .catch((error) => {
            console.error('Error sending email:', error);
        });


Best Practices

Email Content

  • Always include both HTML and plain text versions.
  • Use clear, descriptive subject lines.
  • Personalize emails using user data.
  • Keep content concise and actionable.
  • Include unsubscribe links when required.

Deliverability

  • Authenticate domains using DKIM and SPF.
  • Maintain a good sender reputation.
  • Monitor bounce and complaint rates.
  • Use consistent "From" addresses.
  • Avoid spam trigger words or phrases.

Performance

  • Batch API calls for bulk sending.
  • Implement error handling and retries.
  • Monitor API rate limits.

Setting up Email Hosting

Guide on how to setup email hosting with MailCub

Setup Guide for Email Hosting

1. Choose Your Plan

Select the email hosting plan that fits your needs:

  • Review storage and feature requirements.
  • Decide the number of mailboxes needed.
  • Choose between monthly or annual billing.
    plan selection tab

2. Add Your Domain

Configure your custom domain for professional emails:

  1. From the dashboard sidebar, click Domains.
  2. Click Add Domain and verify ownership.
  3. Configure DNS records (MX, SPF, DKIM).
  4. Wait for propagation (up to 48 hours).

3. Create Email Accounts

  1. Go to Email Accounts in the sidebar.
    option
  2. Click Create Account.
  3. Select your domain and set a strong password.
    create account popup

You can test by sending a sample message via the Send Test Email option.
showing test email

Or visit https://mailbox.mailcub.com/ to access your inbox.

Email Stats & Logs

Guide on how to monitor email logs and delivery with MailCub

Accessing Analytics

MailCub provides comprehensive analytics and delivery logs to help you monitor, optimize, and troubleshoot your email performance. From delivery success rates to open and bounce statistics, MailCub ensures you have full visibility into how your messages perform, whether you're sending a few hundred or millions of emails.

Analytics and logs are available directly in your client dashboard, accessible from the sidebar under Email Logs and Dashboard.

1. Dashboard Overview

Once logged in, your dashboard provides a graphical summary of your email performance, including:

  • Delivery Rate — Percentage of emails successfully delivered.
  • Success Rate — Ratio of emails delivered without error.
  • Email Statistics — Emails that bounced or failed to reach recipients.
  • Tracking by Date Range — View statistics by day, week, or month.
analytics graph section

2. Filtering & Time Range

MailCub lets you filter analytics data by:

  • Specific time periods (last 7 days, 30 days, or last year)

Use the filters at the top of the analytics graph to customize your reports.
filter dropdowns

Accessing Logs

1. Email Logs Sidebar

You can access detailed delivery logs by selecting Email Logs from the sidebar.
Email Logs option

Each log entry provides:

  • Recipient Email Address
  • Message Subject
  • Delivery Status (Success, Failed, Deferred, Bounced)
  • Timestamp
  • Error Message (if failed)

These logs can be filtered by date or delivery status.

2. Viewing Detailed Log Data

To view full delivery details for a specific message:

  1. Go to Email Logs.
  2. Click on a log entry.
  3. A detailed panel will display:
    • Message Sender/Receiver
    • Delivery time
    • Message ID
    • Bounce or success response
detailed log modal

Monitor Key Metrics

  • Review delivery and bounce rates regularly.
  • Identify domains or addresses with repeated delivery failures.

Leverage Reports

Use your analytics to:

  • Improve subject lines and content strategy.
  • Adjust sending frequency.

Next Steps

  • Check your Dashboard for live analytics graphs.
  • Review recent email logs under Email Logs.

Team Management

Guide on how to manage team permissions with MailCub

Overview

MailCub allows team-based collaboration by enabling account owner to invite members, assign permissions, and manage access across email delivery, hosting, logs, and domains. This is especially helpful when multiple users (developers, marketers, admins) need different levels of access.

Invite a Team Member

  1. In the MailCub dashboard, navigate to Sidebar → Manage Team.
  2. Click Add New Member.
    add new member popup
  3. Enter the email address of the person you want to invite.
  4. Choose the permission(s) they should have — for example:
    • Access to Email Delivery features
    • Access to Email Hosting features
    • Ability to view Other Members view
    • Ability to get Subscriptions
    • Ability to view Email Logs and email sending limit
    • Ability to add or manage Domains & Email Accounts
  5. The invited user will receive an email with a link to complete their profile and join your team.
  6. complete profile email example
  7. Once the invitee completes their profile, their account will be activated under your team.

Permission Controls

When setting up or editing a team member's permissions, the team lead can select from distinct access rights:

Permission Description
Email Delivery Access Can send & manage transactional emails, view delivery stats.
Email Hosting Access Can manage mailboxes, domains, hosting settings.
View Team Members Can see list of team members and their roles.
View Email Logs Can access delivery logs and historical status.
Domain & Email Account Management Can add domains, verify DNS, create email accounts.

Team leads can change or revoke permissions at any time via the Manage Team section.

user teams listing

Best Practices for Team Setup

  • Assign least-privilege access — only give team members the permissions they need.
  • Regularly review team member list and permissions, removing access when no longer required.
  • Ensure invited users set up strong passwords and enable two-factor authentication.

Profile Security

Guide on how to secure profile with MailCub

Secure Your Account

MailCub takes security and data protection seriously. Every user account is protected with a login password, and you have the option to enable Two-Factor Authentication (2FA) for an extra layer of protection. You can choose between:

  • Authenticator app-based OTP (e.g., Google Authenticator, Microsoft)
  • Email-based OTP (sent to your email each login)

How to Enable 2FA

  1. Log into your MailCub account.
  2. Navigate to: Profile → Settings → Manage Security.
  3. profile settings page
  4. Under the “Two-Factor Authentication” section, select your preferred method:
    • Authenticator App (OTP via QR code)
    • Email OTP (one-time code sent to your email)
    security options select
  5. If you selected Authenticator App:
    • Scan the displayed QR code using your authenticator app.
    • Enter the 6-digit code generated by the app.
    QR code / input pin page
  6. If you selected Email OTP:
    • Click “Send OTP” and check your email for the code.
    • Enter the code in the field to verify.
  7. Once verified, 2FA will be enabled for your account. From your next login and onward, you will need to provide your password and the OTP from your chosen method.

Best Practices

  • Use strong, unique passwords for your MailCub account.
  • Whenever possible, prefer authenticator app-based 2FA (it's more secure than email OTP).
  • Periodically review your Security settings and update them if needed.

API Rate Limits

API rate limit guide with MailCub

Email sending API rate limit

  • For the transactional email API, MailCub enforces a rate limit of 15 requests per second per API key.
  • Other usage limits (domains, mailboxes, storage, monthly email volume) depend on your plan.
  • If you exceed your plan's quota or send volume beyond caps, your account usage may be restricted or you may need to upgrade.

Plan Types & Purpose

Different subscription plan type and access guide

Plan Access Description

Plan Type Domains Allowed Storage Email Send API Mailboxes Ideal Use Case
Email Delivery Plan Yes No Yes Yes No Applications sending sign-up, notification emails, newsletters
Email Hosting Plan Yes Yes No No Yes Businesses needing inboxes under their domain, not mass sending
Generic Plan Yes Yes Yes Yes Yes All-in-one: send emails + host mailboxes + manage domains

Other Platform Limits & Conditions

Account ban and suspension guideline on MailCub

Account Suspension Guideline

  • The number of domains you can add, mailboxes you can create, and storage allocation all depend on your chosen plan.
  • If you exceed your **monthly email sending limit**, you must **upgrade** your plan to obtain a greater limit.
  • Account Suspension: If your account shows spammy behaviour (high bounce/complaint rates, policy violations) MailCub will suspend or restrict your account regardless of quota.
  • API Rate Limit (15 requests/second) remains across all plans; high-volume senders should design batch sending to avoid hitting this threshold.

Best Practices & Recommendations

  • Choose a plan based on your monthly email volume, number of mailboxes/domains, and whether you need both sending + hosting.
  • Monitor your API usage, monthly email quota, and mailbox/storage usage regularly.
  • Upgrade ahead of time instead of waiting until you hit a cap.
  • Maintain good sending practices (list hygiene, authenticated domains, low bounce rates) to stay within acceptable usage and avoid account restrictions.

FAQ

Famous question and quries related to Mailcub actions

Q: Is there a plan that includes both Email Delivery and Hosting?
A: Yes. MailCub offers plans that let you use both transactional email delivery and professional inbox hosting under one account. You can visit the Pricing page for details and which tiers include both services.
pricing page

Q: Do you offer a free trial or free plan?
A: Yes. You can sign up for free trial and explore MailCub's core features before upgrading. The free tier allows you to test email sending, basic hosting, and essential features.

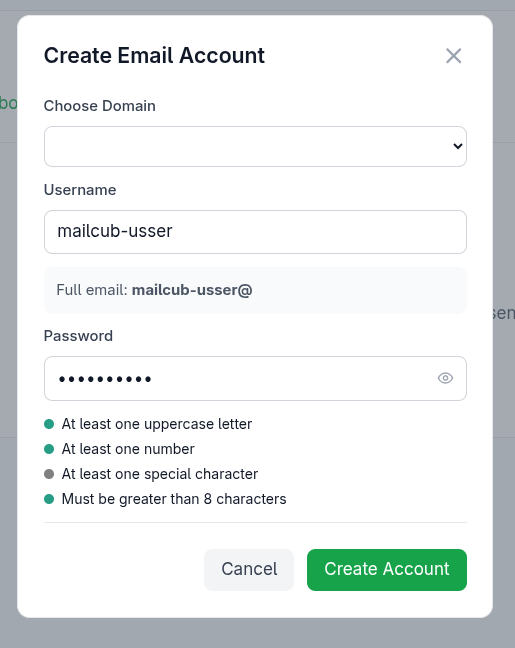
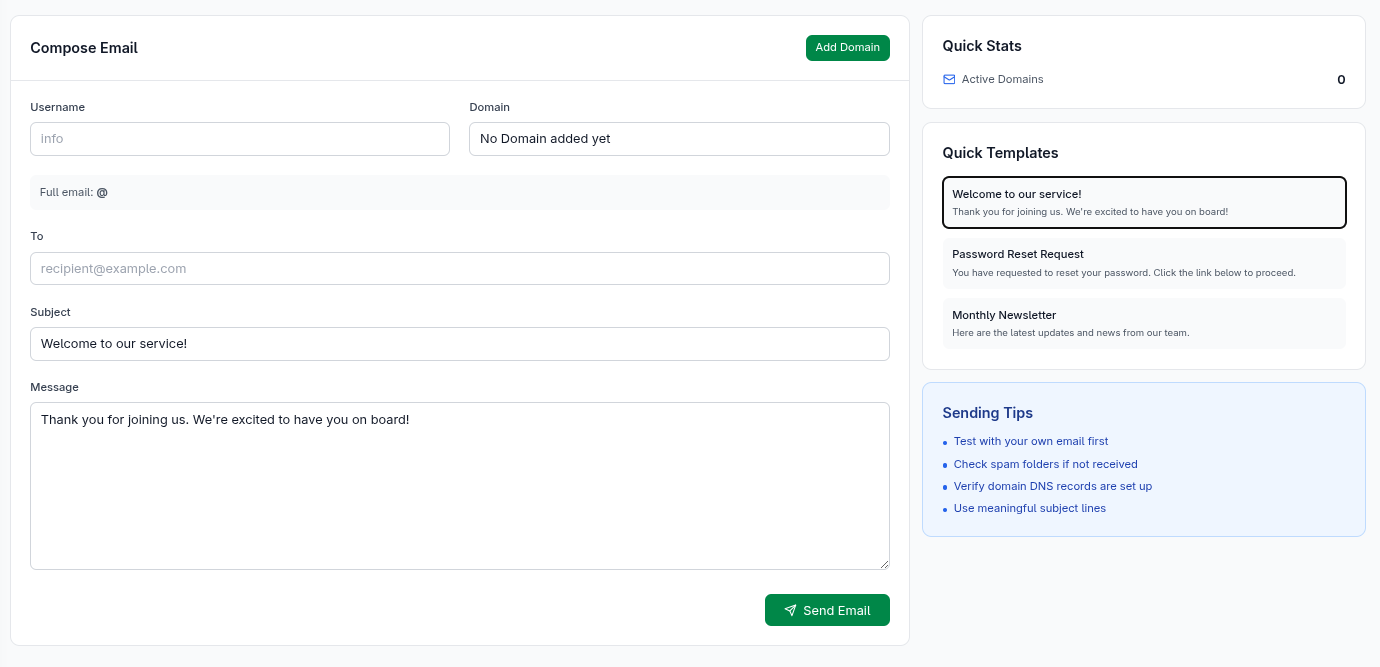
Q: What features are included in the hosting service?
A: The hosting service allows you to add custom domains, create mailboxes, send and receive email from professional addresses (e.g., yourname@yourdomain.com), and integrate with your apps or workflows as needed.

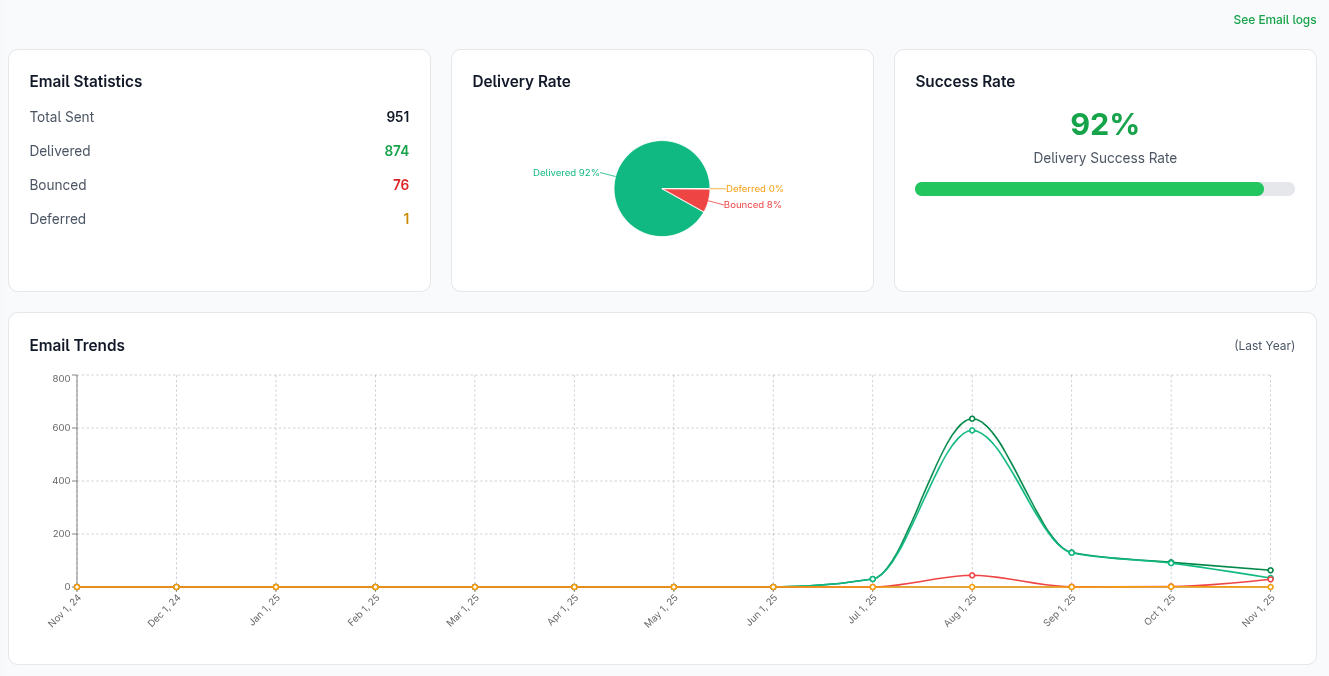
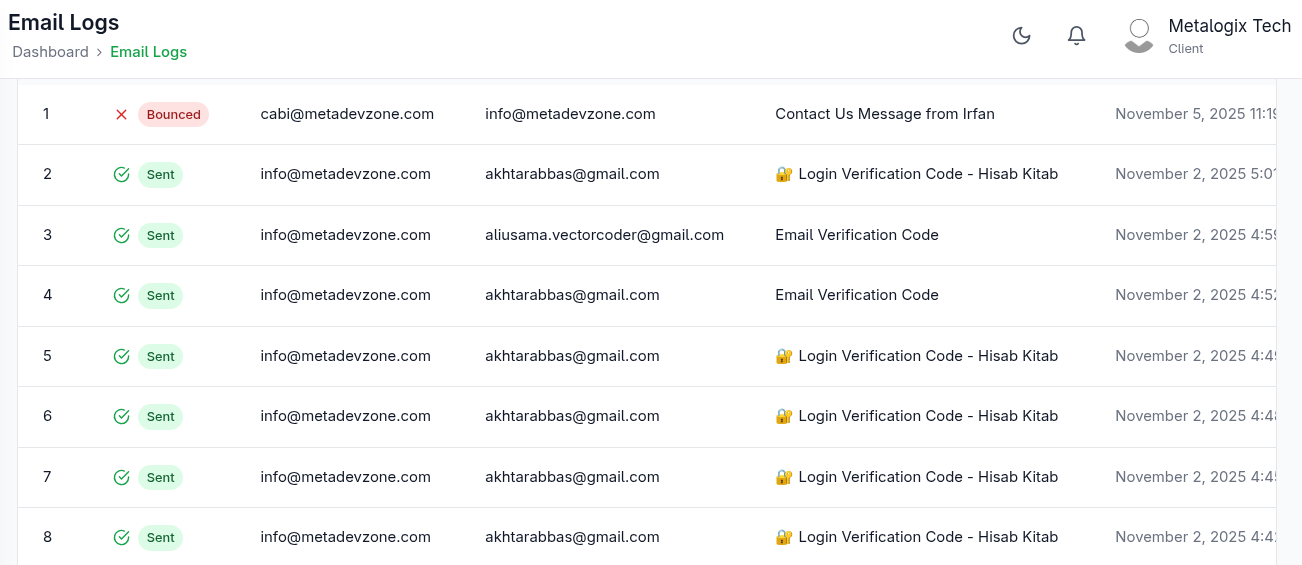
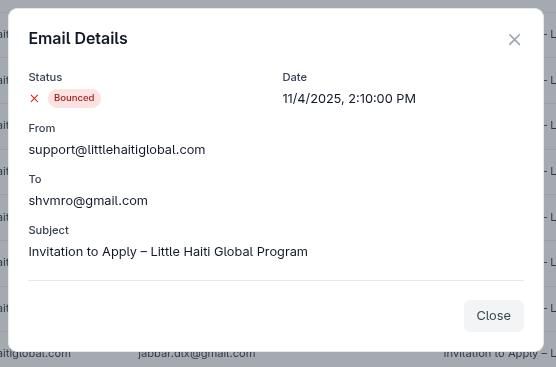
Q: How do you handle analytics and logs?
A: MailCub provides both high-level analytics (delivery rate, success rate, tracking by day/month) and detailed logs (per-message status, timestamps, error messages). You can access these via the Dashboard and the Email Logs menu in your account.

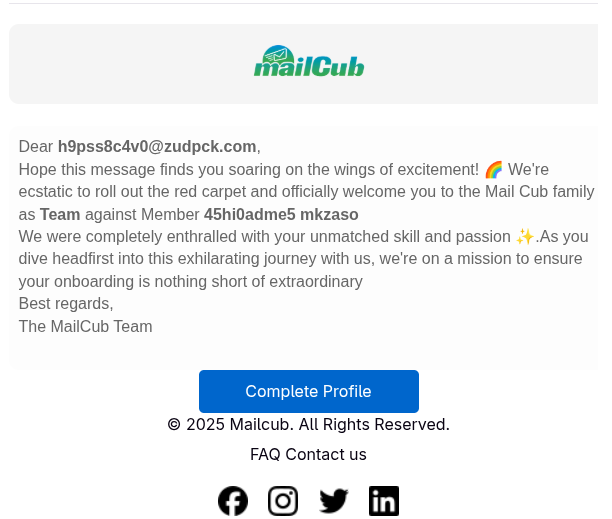
Q: Can I allow my team to use shared account under restricted permissions?
A: Yes. MailCub supports team management. You can invite users by email, and as the team lead you can assign permissions (access to email delivery, hosting, logs, domains, etc). The invited user will complete their profile, and then join your team with the assigned permissions.

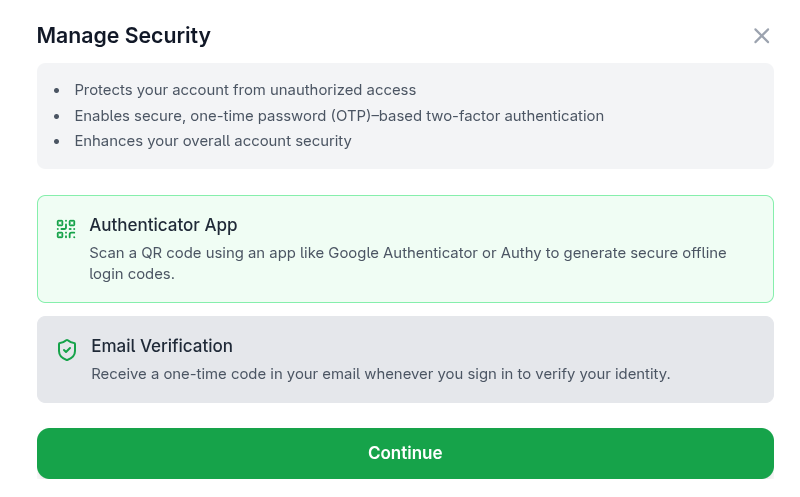
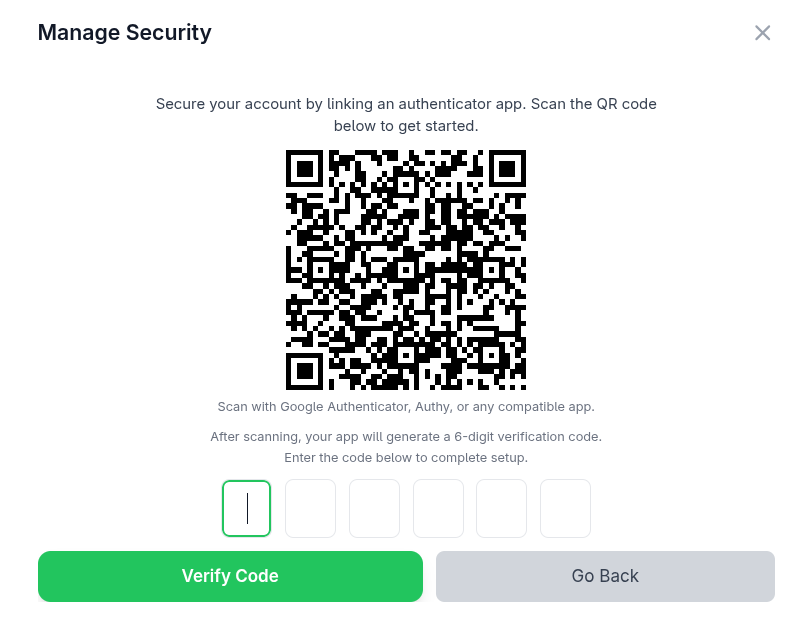
Q: Is Two-Factor Authentication supported?
A: Yes. For improved security, you can enable 2FA via either an authenticator app (e.g., Google Authenticator) or an email-based OTP. After you've verified your chosen method in your Profile → Settings → Security, 2FA becomes required on your next login.

Q: What if I hit a delivery failure or bounce problem?
A: If you see bounces or failed deliveries, check your domain authentication (SPF, DKIM), sender reputation, contact list quality, and delivery logs. Use the detailed logs in MailCub to diagnose the issue. If needed, contact support with relevant log entries.

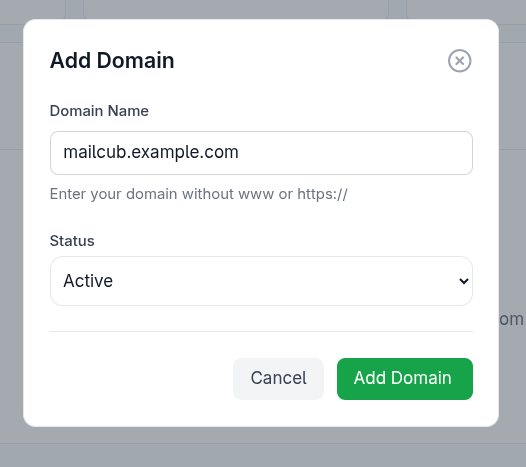
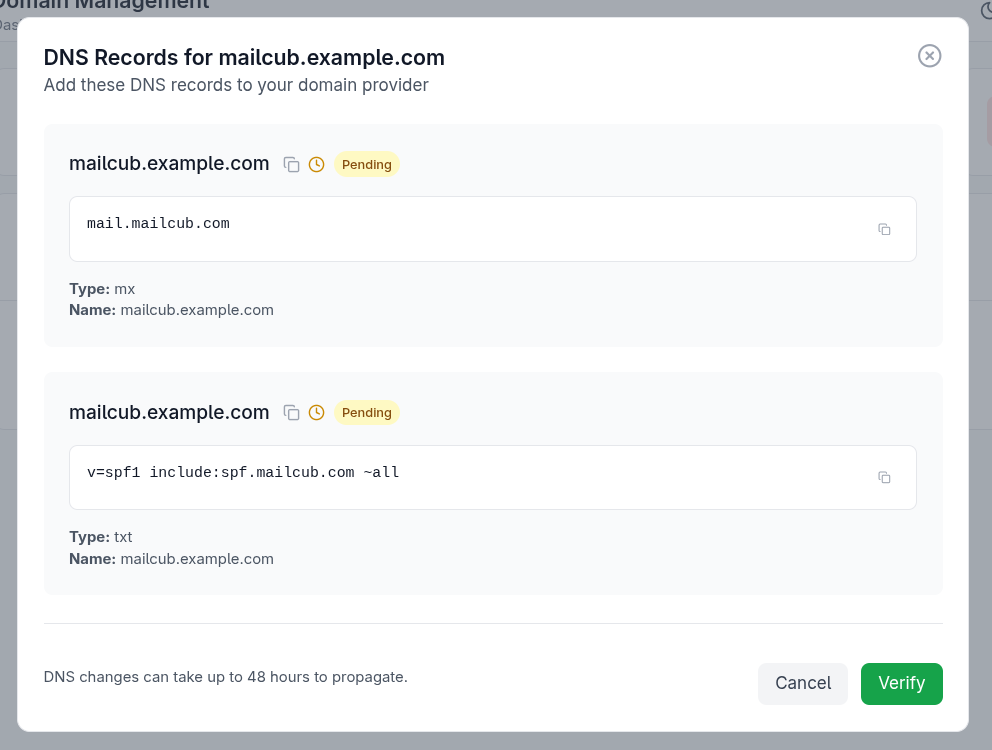
Q: Do I need to verify my sending domain?
A: Yes. To ensure optimal deliverability and help protect your sender reputation, you should add and verify your custom domain in MailCub by updating your DNS (MX, SPF, DKIM). This is required before you start sending from that domain.

Q: How quickly can I upgrade if I hit my plan limit?
A: You can upgrade your plan at any time through the dashboard. Once upgraded, your new limits (domains, mailboxes, sending volume) apply immediately.

Q: Can I switch from one plan type to another (e.g., hosting → delivery)?
A: Yes — you may change plan types via your account settings. If you signed up on a hosting-only plan but later need delivery capabilities, upgrade to a generic plan.

Q: What happens if I exceed the monthly email sending limit?
A: If you exceed your plan's monthly quota, you must upgrade to a higher tier to get a greater limit.

Q: Do you support custom domains for sending and receiving?
A: Yes — MailCub supports custom sending domains (verified via DNS: MX, SPF, DKIM) and hosting domains for professional mailboxes.

Q: What delivery analytics are included in standard plans?
A: Standard plans include basic reporting and analytics: e.g., delivery rate, success/failure list, daily/weekly tracking. More advanced analytics may be available on higher tiers.

Q: Is the API rate limit the same across all plans?
A: Yes — the API rate limit of 15 requests per second applies across all plans. Larger plans may offer higher volume sending but the per-second rate remains the same.

Q: How is team management handled?
A: The team lead can invite members by email under Manage Team, choose permissions (delivery access, hosting access, logs view, domain management), and the member joins your team by completing their profile.

Q: What security features are available for my account?
A: You can secure your account via password and enable Two-Factor Authentication (2FA) — either via authenticator app or email OTP. 2FA becomes required at your next login once enabled.

Q: Will my account be suspended if I send spam or have high bounce rates?
A: Yes — MailCub may suspend accounts that violate policy, show spam behaviour, or have high bounce/complaint-rates, regardless of plan.